| Chapter 4. System Administration | ||
|---|---|---|
 |  | |
| Chapter 4. System Administration | ||
|---|---|---|
| | | |
Table of Contents
You will have created your first user as part of the initial setup of your FB6000, as detailed in either the QuickStart Guide or in Chapter 2 in this manual.
To create, edit or delete users, browse to the config pages by clicking the "Edit" item in the sub-menu under the "Config" main-menu item, then click on the "Users" category icon. Click on the "Edit" link adjacent to the user you wish to edit, or click on the "Add" link to add a user.
To delete a user, click the appropriate "Edit" link, then click the "Erase" button in the navigation controls - see Figure 3.8. As with any such object erase operation, the object will not actually be erased until the configuration is saved.
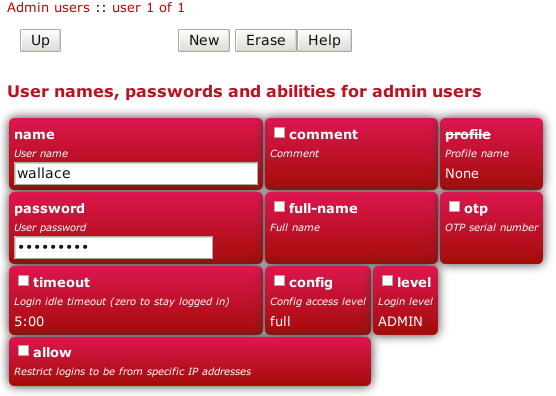
Once you have added a new user, or are editing an existing user, the object editing page will appear, as shown in Figure 4.1 :-
The minimum attributes that must be specified are name, which is the username that you type in when logging in, and
password - passwords are mandatory on the FB6000.
You can optionally provide a full name for the specified username, and a general comment field value.
A user's login level is set with the level attribute, and determines what CLI commands the user can run.
The default, if the level attribute is not specified, is ADMIN - you may wish to downgrade the level for
users who are not classed as 'system administrators'.
Table 4.1. User login levels
| Level | Description |
NOBODY | No access to any menu items, but can access control switches for which the user has access. |
GUEST | Guest user, access to some menu items |
USER | Normal unprivileged user |
ADMIN | System administrator |
DEBUG | System debugging user |
The configuration access level determines whether a user has read-only or read-write access to the configuration,
as shown in Table 4.2 below. This mechanism can also be used to deny all access to the configuration using the
none level, but still allowing access to other menus and diagnostics.
This setting is distinct from, and not connected with, the login level described above. You can use the access level to
define, for example, whether a USER login-level user can modify the configuration. Typically an ADMIN (or DEBUG) login-level user would always be granted
full access, so for ADMIN or DEBUG level user's, the default of full is suitable.
Table 4.2. Configuration access levels
| Level | Description |
none | No access unless explicitly listed |
view | View only access (no passwords) |
read | Read only access (with passwords) |
full | Full view and edit access - DEFAULT |
To improve security, login sessions to either the web user interface, or to the command-line interface (via telnet, see Chapter 17),
will time-out after a period of inactivity. This idle time-out defaults to 5 minutes, and can be changed by setting the timeout attribute
value.
The time-out value is specified using the syntax for the XML fb:duration data type. The syntax is hours, minutes and seconds, or minutes and seconds or just seconds. E.g. 5:00.
To set a user's time-out in the user interface, tick the checkbox next to
timeout, and enter a value in the format described above.
Setting a timeout to 0 means unlimited and shoudl obviously be used with care.
You can restrict logins by a given user to be allowed only from specific IP addresses, using the allow attribute.
This restriction is per-user, and is distinct from, and applies in addition to, any restrictions specified on either the web or telnet (for command
line interface access) services (see Section 12.3 and Section 12.4), or any firewall rules that affect web or
telnet access to the FB6000 itself.
The FireBrick allows a general definition of IP groups which allow a name to be used in place of a range of IP addresses. This is a very general mechanism that can be used for single IP addresses or groups of ranges IPs, e.g. admin-machines may be a list or range of the IP addresses from which you want to allow some access. The feature can also be useful even where only one IP is in the group just to give the IP a meaningful name in an access list.
These named IP groups can be used in the allow list for a user login, along with specific IP addresses or ranges if needed.
However, IP groups can also list one or more user names and implicitely include the current IP address from which those users are logged in to the web interface. This can be useful for firewall rules where you may have to log in to the FireBrick, even as a NOBODY level user, just to get your IP address in an access list to allow further access to a network from that IP.
By specifying a profile name using the profile attribute, you can allow logins by the user only when the
profile is in the Active state (see Chapter 8). You can use this to, for example, restrict logins to be allowed only during
certain times of the day, or you can effectively suspend a user account by specifying an always-Inactive profile.
Under the main config menu you will find an option to set up OTP (One Time Password). This allows details of a OATH one time password such as a keyring OATN device, or an app on a mobile phone. The device/app provides a series of digits which change automatically.
To set up an OATH device you will need to know a key, which is a long string of random hexadecimal digits. Some apps can provide a random key for you to copy/paste in to the set up page. If you have means to generate a suitably long random hex string you could enter in to the device settings and the setup page. As long as the key matches then the AOTH device should work. For a pysical OATH device the key is pre-set and supplied with the device. The key needs to be secret.
In order to link the OATH settings to a user you need a serial number. This is just a string of characters. If you have a physical OATH device then it is likely to have a serial number on it. If using an app on a phone you could make the serial number that of the phone, or just "fred's iphone" or some such.
You will also have to specify if the OATH device uses time or event coding. For time based you need to say the time interval, e.g. 30 or 60 seconds. Time based tokens change automatically on time, but event based tokens change every time you use them. If using the same device for more than one FireBrick then you should use time based as the event based devices use up the codes when accessing one FireBrick and so can become out of sync when going back to another FireBrick later. A time based device cannot get out of sync like that. You also have to say how many digits are used. A common setting is time based, 60 seconds, and 6 digits.
As part of the set up you will ahve to enter a sequence of three codes. For time based tokens you have to wait for the next code. Do not leave any out, put exactly three codes in order. If the details are all correct then the FireBrick confirms the token is loaded. You cannot then access the details of the token, they are secret. You can load many different tokens with different serial numbers.
Finally, to associate an OATh device with a user login, put the serial number in the otp setting for the user. This then means that all logins with that username require the sequence of digits at the start of the password. You can, in such cases, leave the password blank if you only want to use the digits to log in, but this is not recommended. The password as typed is the sequence of digits immediately follwoed by the password you have set for the user. Once a sequence is used, it cannot be re-used, so if you login, logout, and login again trying the same code, it will not work and you have to wait for (or request) a new code.
| | | |
| 3.6. Downloading/Uploading the configuration |  | 4.2. General System settings |